Nature provides us such pretty things.
Alright, so I ended up stabbing them with needles...but it was for a good cause. If you live in Michigan you know it's been quite hot lately, which has kick-started my lemonade cravings. It also means drinks sweat ALL the time, and for the first time in my life I have a piece of furniture that I don't want water stains on. The best solution to any problem is one that involves yarn, sharp objects, and wool. Right? (For maybe the first time ever, no knitting was done for this post.)

So here's what you do to make your own coasters at home:
1. Take an old all-wool sweater and wash it- hottest water, longest agitation, lots of sudsy laundry detergent. Normally you would never do this on purpose, but if you've done it accidentally and have a sweater that would now fit a child, here's a useful way to make yourself feel slightly better about shrinking it. (Destruction with scissors is pretty cathartic too.)
2. Use a bowl and chalk to outline circles on the sweater, then cut. You can actually do any shape you want- felted wool won't unravel.
3. Put whatever object you want to outline down on the circle/square/whatever shape. If you can, secure it down somehow so you don't get a weird wiggly outline as you go around. If you're a better artist than I, freehand something.
4. Get your needle felting needles. This is where you could really, really hurt yourself. My needle is in the above picture at the top right, and it is sharp. VERY SHARP. Look at it compared to the blunt darning needle! I sort of laughed at the dire warnings on the package, but after using them once, my fear is real.
4. Needle felting needles are very cool (and dangerous! even cooler!). Basically, they're barbed (and sharp!) needles that agitate the wool layers together when you stab them. So you lay out the yarn and stab it repeatedly until the yarn totally sticks. The cool thing is that you can very loosely stab your design at first, then adjust or pull it out if you don't like it. Once you settle on a final design, just stab the hell out of it.
6. You're done! That's it. Really. It's so easy. I'll probably make a few more at some point and do something more complicated- but for now I can have my iced coffee AND protect my furniture. Mmm.

Kitty is, as usual, unhelpful. Bob doesn't care for knitting in the least (and was probably napping), but catnip or no, Kitty's there.
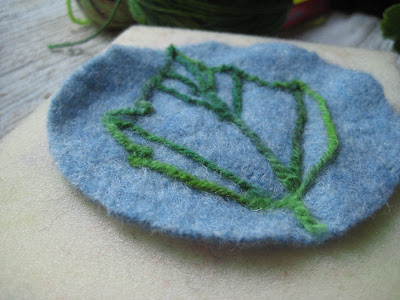
Finished! The variegated yarn actually suited the leaf coloring perfectly. It's usually easier to needle felt with roving (unspun wool) instead of yarn...but you can also unravel and fluff up your yarn for an easier time of things. Per usual, I was winging it.

Geranium and maple leaves.